
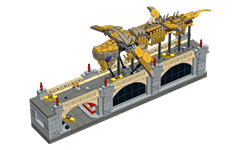
When the LEGO Avengers Tower set was first announced, my attention was immediately drawn not to the tower itself, but to the Chitauri Leviathan model it included. It looked to be about the same size as my Flight of the Luck Dragon model, and thoughts of making it move in the same way started running through my mind.
As soon as the set was released, I downloaded the instructions, cobbled together a Leviathan with parts I had on had, and set out to recreate the scene from The Avengers where The Hulk faces off against a Leviathan on the Park Avenue Viaduct in New York.
You can see a demonstration of the model in action in the following video and find extensive build notes below if you’d like to build one for yourself. A full kit is also available from BuildaMOC.
Instructions
A kit is available from BuildaMOC, which includes the pieces needed to build the model along with a digital copy of the instructions. If you would like to source the parts yourself, you can purchase just the instructions from Rebrickable.
Build Notes
The Leviathan is a modified version of the model that comes in set 31088 Avengers Tower. If you own that set, you already have most of the pieces needed to build the Leviathan. You will have to rebuild it though, as all of the body segment connections need be replaced in order to mount it on the supports.
Thankfully, none of the parts in the Leviathan are unique or particularly rare, so if you don’t own the set, they are all available on the secondary market.

Inventory
The main inventory is for the full model, including all the pieces needed to build the Leviathan. If you already own the Leviathan from the Avengers Tower, you can use the ‘StandOnly’ inventory file that comes with the building instructions.
If you plan to motorize the model as per the building instructions, you will also need the following Circuit Cubes components.
1 x Geared Motor Cube
1 x Battery Box (Regular or Bluetooth)
Drive Shaft
Pay special attention when assembling the main drive shaft, as the orientation of all the pulley wheels is critical to the model flowing smoothly.
You will also want to make sure the drive shaft spins freely after it is assembled. As you press the pulleys and Technic beams onto the drive shaft, it is easy to push them on too much, introducing friction into the system. Once you are finished building the drive shaft, you can gently wiggle the pulleys from side to side along the axles until they rotate smoothly between the Technic bricks supporting them.

Jaw
The bar supporting the jaw rests freely in the space under the front of the jaw. The jaw movement works best when the lower jaw is pushed forward as much as it can be, and the head is ever so slightly tilted up.
Side Detail ‘Claws’
When clipping the ‘claws’ along the side of the model, it’s important not to rotate them too much underneath the model, as they can interfere with the supports and affect the movement. Except for the ones on the front section, which can be rotated all the way underneath.
Motor
The instructions illustrate how to motorize it using a Circuit Cubes Geared Motor Cube and Battery Box. The motor can be easily added or removed by breaking the model open (see video above). The two gears needed to connect the motor are included in the inventory. When the motor is inserted, the crank shaft cannot be rotated by hand.


![[Valid RSS]](https://bricksrss.com/wp-content/uploads/2023/05/valid-rss-rogers.png "Validate my RSS feed")